Electric Scooter Brakes for Beginners
*We may earn a commission for purchases made using our links. Please see our disclosure to learn more.
Electric scooter brakes may not be the most exciting feature to compare, but they are among the most important parts of any scooter. Motor power determines how quickly a scooter accelerates, while the braking system determines how safely and predictably it slows down.
For beginners, electric scooter braking can be confusing because scooters may use disc brakes, drum brakes, electronic brakes, foot brakes, or a combination of several systems. Two scooters with the same maximum speed can also feel completely different when braking because of their tire condition, rider weight, brake adjustment, road surface, suspension, and brake design.
Understanding these basics helps you choose a safer scooter, recognize developing problems, and avoid common riding mistakes. The U.S. Consumer Product Safety Commission recommends checking an electric scooter for damage before every ride, including its brakes, tires, cables, handlebars, throttle, lights, and frame.
“Before riding, ensure the handlebars, brakes, throttle, bell, lights, tires, cables, and frame are in good condition.”
Source: U.S. Consumer Product Safety Commission, E-Scooter Safety Alert.
Key Takeaways
- Electric scooters commonly use disc, drum, electronic, regenerative, or rear-fender brakes.
- A scooter with two independent braking methods generally provides more dependable stopping control than one relying on a single system.
- Beginners should apply the brakes progressively rather than suddenly grabbing the brake lever.
- Tires, rider position, weather, speed, and road conditions all influence stopping distance.
- Squealing, scraping, weak braking, excessive lever travel, vibration, or pulling to one side can indicate a brake problem.
- Inspect and test the brakes before every ride, but leave hydraulic repairs or uncertain adjustments to a qualified technician.
- Replacement pads, rotors, cables, and fluids must be compatible with the exact scooter model and brake system.
Four Useful Brake-Maintenance Products
Product availability, pricing, and compatibility can vary. Always check the manufacturer’s specifications and confirm that a tool is suitable for your scooter before purchasing or using it.
1. Park Tool TW-5.2 Ratcheting Click-Type Torque Wrench


The Park Tool TW-6.2 Ratcheting Torque Wrench is a precision tool designed to help tighten bolts to the manufacturer's recommended torque specification. Featuring a 3/8-inch ratcheting drive and an adjustable click mechanism, it allows users to preset torque values between 10 and 60 Nm for accurate and consistent fastening. Constructed from durable alloy steel, the TW-6.2 is suitable for servicing electric scooters, bicycles, and other equipment that requires precise torque. Its long handle provides added leverage, while the audible and tactile click signals when the selected torque has been reached, helping reduce the risk of over-tightening critical components.
- Wide Torque Range: Covers 10–60 Nm, making it suitable for larger fasteners commonly found on electric scooters and bicycles.
- Precision Adjustment: The dial-adjust click mechanism allows accurate torque settings for consistent bolt tightening.
- Durable Construction: Made from alloy steel with a ratcheting 3/8-inch drive for long-lasting performance.
- Not Ideal for Low-Torque Fasteners: The minimum setting of 10 Nm is too high for many smaller bolts, such as some brake lever or accessory fasteners.
- Bits and Sockets Sold Separately: Additional sockets or adapters may be needed depending on your scooter's hardware.
- Premium Price: Costs more than basic torque wrenches, which may not suit occasional users.
The Park Tool TW-5.2 has a torque range of 2 to 14 Newton-meters and is designed for lower-torque applications, including many brake-related fasteners. It helps riders tighten compatible bolts to the scooter manufacturer’s recommended specification instead of relying on guesswork.
Best for: Riders performing routine adjustments that require precise torque.
Important limitation: The wrench does not include every socket or bit needed for every scooter. Check the required fastener size and torque specification first.
2. Finish Line Bike Brake Cleaner
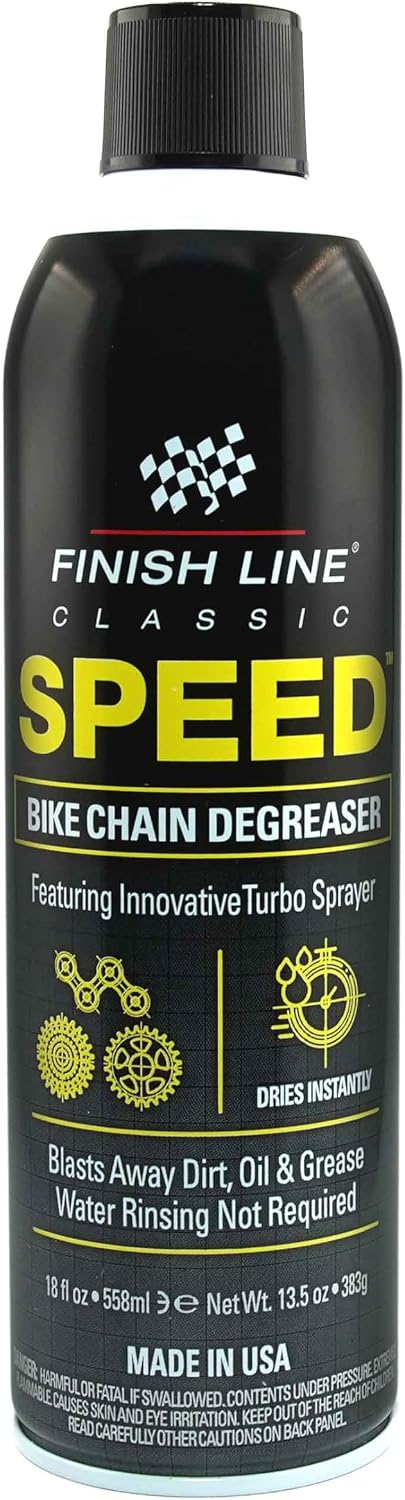


The Finish Line Speed Bike Degreaser is a fast-acting cleaner designed to remove grease, oil, dirt, and grime from bicycle drivetrains and brake components. Its powerful formula helps dissolve built-up contaminants on chains, gears, cassettes, and compatible metal parts, making routine maintenance quicker and more effective. For electric scooter owners, it can be useful for cleaning greasy drivetrain components on applicable models and other compatible metal parts before maintenance. Always follow the manufacturer's instructions and avoid applying degreaser directly to brake pads or other friction surfaces unless specifically approved, as residue can reduce braking performance.
- Fast-Acting Formula: Quickly breaks down grease, oil, and built-up grime to simplify cleaning.
- Versatile Use: Suitable for chains, gears, cassettes, and other compatible metal components.
- Easy Maintenance: Helps prepare parts for lubrication and routine servicing.
- Not for Brake Pads: Contact with brake pads or friction surfaces can reduce braking performance if not used correctly.
- Requires Proper Ventilation: Should be used in a well-ventilated area while following the product's safety instructions.
- May Require Multiple Applications: Heavy grease buildup may need repeated cleaning for best results.
Finish Line Bike Brake Cleaner is designed to remove dirt and contamination from compatible disc-brake rotors and brake components. It evaporates quickly and is formulated to avoid leaving an oily residue on the braking surface.
Best for: Cleaning compatible disc-brake rotors according to the product instructions.
Important limitation: Cleaning cannot restore brake pads that are severely contaminated, damaged, glazed, or worn out. Avoid spraying electrical components and confirm material compatibility before use.
3. Park Tool ATD-1.2 Adjustable Torque Driver


The Park Tool ATD-1.2 Adjustable Torque Driver is a shop-quality precision tool designed to prevent over-tightening when working on lightweight components. It features an adjustable torque setting of 4, 4.5, 5, 5.5, or 6 Newton-meters (Nm), making it ideal for tightening smaller fasteners to the manufacturer's recommended specification. Built with an all-metal internal mechanism for durability, the ATD-1.2 provides consistent torque with a simple clockwise operation. Its compact size makes it easy to carry in a toolbox and convenient for routine maintenance on electric scooters, bicycles, and other equipment with low-torque fasteners.
- Prevents Over-Tightening: Adjustable torque settings help protect lightweight components and threaded fasteners from damage.
- Durable Construction: All-metal internal components are built for long-term reliability and consistent performance.
- Compact and Easy to Use: Lightweight design and preset torque settings make routine maintenance quick and straightforward.
- Limited Torque Range: Only supports 4–6 Nm, so it is not suitable for larger fasteners requiring higher torque.
- Clockwise Operation Only: Torque-limiting function works only when tightening, not when loosening bolts.
- May Require Additional Bits: Depending on your scooter or bicycle, compatible driver bits may need to be purchased separately.
The Park Tool ATD-1.2 can be adjusted to 4, 4.5, 5, 5.5, or 6 Newton-meters. It includes several common small fastener bits and is designed to limit the applied torque once the selected setting is reached.
Best for: Brake-lever, control, and accessory fasteners whose recommended torque falls within its adjustment range.
Important limitation: It is not suitable for fasteners requiring less than 4 or more than 6 Newton-meters.
4. Jagwire Sport Hydraulic Brake Line Cutter


The Jagwire Sport Hydraulic Brake Line Cutter is a compact repair tool designed to create clean, even cuts on compatible hydraulic brake hoses. A precise cut helps reduce crushed or uneven hose ends, which can make installation more difficult and affect how securely fittings are attached. Made for cycling brake systems and commonly used by professional mechanics, this tool can also support electric scooter maintenance when the scooter uses compatible hydraulic brake components. It is best suited to experienced users who understand hose replacement, fitting installation, and brake bleeding procedures.
- Clean Hose Cuts: Produces a straighter, more controlled cut than standard scissors or general-purpose cutters.
- Professional-Grade Design: Built for hydraulic brake servicing and commonly used by experienced mechanics.
- Compact Tool: Easy to store in a repair kit or workshop drawer.
- Specialized Use: Designed mainly for hydraulic brake hoses, so it has limited value for scooters with mechanical or drum brakes.
- Additional Tools Required: Hose installation may also require fittings, inserts, fluid, and a brake bleeding kit.
- Not Beginner-Friendly: Incorrect hydraulic brake work can lead to leaks or poor braking performance.
The Jagwire Sport Hydraulic Brake Line Cutter is designed to create a clean, even cut on compatible hydraulic brake hoses. Its design holds the hose securely while cutting, which can help reduce crushed or uneven hose ends.
Best for: Experienced home mechanics installing a manufacturer-approved hydraulic brake hose.
Important limitation: Cutting the hose is only one part of hydraulic brake installation. The job may also require compatible fittings, inserts, fluid, bleeding tools, and model-specific procedures. Beginners should generally leave hydraulic brake work to a qualified technician.
How Electric Scooter Brakes Work
A brake slows a scooter by converting movement into another form of energy.
Mechanical brakes create friction. A brake pad, shoe, or other component presses against a rotating surface connected to the wheel. That friction reduces the wheel’s speed and produces heat.
Electronic brakes work differently. The scooter’s motor resists wheel rotation when the rider activates the brake control. Some systems send part of the recovered energy back toward the battery, while others mainly use motor resistance to slow the scooter.
Many modern scooters combine mechanical and electronic braking. For example, Segway markets models that pair an electronic brake with a mechanical drum brake operated through one lever.
The combination matters because different brakes have different strengths. A mechanical brake can continue operating even when regenerative braking is limited, while an electronic system can assist the mechanical brake and reduce some of its workload.
Main Types of Electric Scooter Brakes
1. Disc Brakes
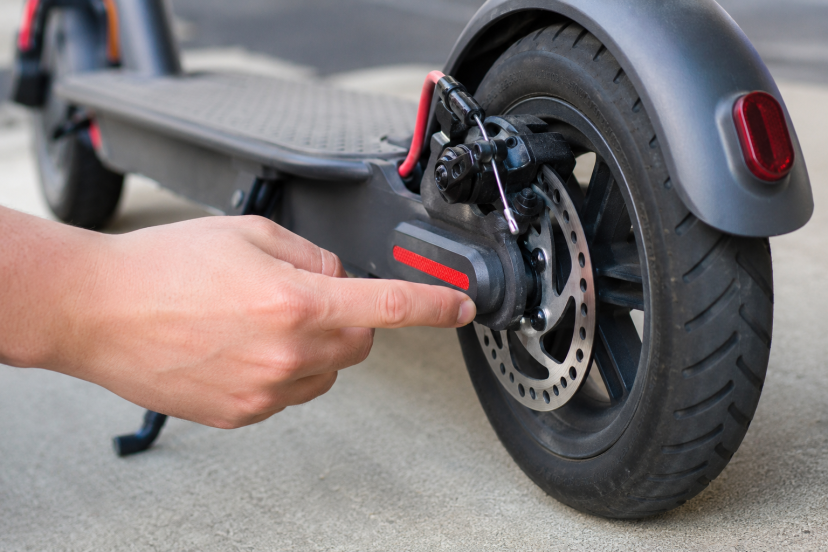
Disc brakes are easy to identify. A thin metal rotor is attached near the center of the wheel. When the brake lever is pulled, a caliper squeezes brake pads against the rotor.
Electric scooters may use mechanical or hydraulic disc brakes.
A mechanical disc brake uses a steel cable to move the caliper. Pulling the brake lever creates tension in the cable, which pushes one or both pads toward the rotor.
A hydraulic disc brake uses fluid pressure instead of a conventional cable. Pulling the lever moves brake fluid through a sealed hose, causing pistons in the caliper to press the pads against the rotor.
Advantages of disc brakes include:
- Strong braking potential
- Good heat dissipation
- Visible pads and rotors
- Adjustable or replaceable parts
- Effective performance on faster and heavier scooters
Possible disadvantages include:
- Exposed rotors can become bent
- Pads eventually wear out
- Oil or lubricant can contaminate the braking surfaces
- Mechanical cables may stretch or loosen
- Hydraulic systems may require bleeding or professional service
Disc brakes are common on performance scooters, but they must be kept properly aligned. A slightly bent rotor or misaligned caliper can cause rubbing, scraping, or pulsing.
2. Drum Brakes
A drum brake is enclosed inside the wheel hub. When activated, internal shoes press against the inside of the drum to create friction.
Because the braking components are protected inside the hub, drum brakes are less exposed to dirt, water, impacts, and accidental contamination than open disc brakes.
Advantages of drum brakes include:
- Enclosed construction
- Relatively low maintenance
- Less risk of bending an exposed rotor
- Consistent everyday operation
- Good suitability for commuter scooters
Possible disadvantages include:
- Internal parts are harder to inspect
- Heat can remain trapped inside the drum
- Service may require wheel removal
- Braking can feel less sharp than a strong disc-brake setup
Drum brakes are not automatically inferior to disc brakes. For beginners and everyday commuters, their protected design and lower maintenance requirements can be valuable.
3. Electronic Brakes
An electronic brake uses the scooter’s motor to resist rotation. It may be controlled by a brake lever, thumb control, or a combined braking system.
Electronic brakes have few exposed wear components, so they can reduce dependence on friction pads. However, braking strength varies substantially among scooters.
An electronic brake should not automatically be treated as a complete replacement for a dependable mechanical brake. Its performance can depend on the scooter’s electronics, battery condition, speed, controller programming, and system design.
Some scooters also allow the rider to change electronic braking strength through a companion app. Stronger settings can produce more noticeable deceleration when the throttle is released or the brake is activated.
4. Regenerative Brakes
Regenerative braking is a type of electronic braking. The motor temporarily operates as a generator, resisting wheel movement while converting some kinetic energy into electrical energy.
The recovered energy may be sent back toward the battery. However, riders should not expect regenerative braking to recharge a large percentage of the battery during ordinary trips.
Its more important practical benefit is supplemental slowing. It can make deceleration smoother and may reduce some mechanical brake wear.
Regenerative braking can sometimes be limited when the battery is fully charged because there may be little capacity available to accept recovered energy. Exact behavior depends on the scooter, so riders should read the manufacturer’s instructions rather than assuming the regenerative brake will always feel identical.
5. Rear-Fender or Foot Brakes
A rear-fender brake is activated by pressing a foot against a movable fender above the rear wheel. The fender presses against the tire and creates friction.
This design is simple and familiar to riders who have used conventional kick scooters.
Advantages include:
- Simple construction
- No brake cable
- Useful as a backup on some models
Disadvantages include:
- Requires moving one foot
- Can affect rider balance
- May be less effective in wet conditions
- Produces tire and fender wear
- Usually offers less precise control than a hand-operated system
A fender brake can provide extra slowing power, but beginners should practice using it in a controlled area before depending on it.
Is a Dual-Brake System Better?
A dual-brake system uses two braking methods or brakes on two wheels. Examples include:
- Front electronic brake and rear drum brake
- Front drum brake and rear electronic brake
- Front and rear disc brakes
- Disc brake combined with regenerative braking
- Hand brake combined with rear-fender braking
The main benefit is redundancy. If one system becomes weaker or unavailable, another may still provide some stopping ability.
However, the phrase “dual braking” does not guarantee excellent performance. A weak electronic brake paired with a small fender brake may not stop as effectively as a properly designed and maintained mechanical system.
Buyers should examine the actual brake types, wheel arrangement, controls, adjustment requirements, and independent test results rather than relying only on the word “dual.”
Front Brakes Versus Rear Brakes
During braking, weight shifts toward the front of the scooter. This gives the front tire more potential traction but also makes sudden front-wheel braking risky when performed incorrectly.
Rear-wheel braking often feels less intimidating to beginners. However, the rear wheel can lock or skid more easily because braking reduces the amount of weight pressing it against the ground.
The safest technique depends on the scooter’s design. On a linked system, one lever may automatically activate both brakes. On a scooter with separate controls, the rider must learn how the front and rear systems interact.
Avoid intentionally locking either wheel. A locked rear wheel may slide sideways, while a locked front wheel can cause an abrupt loss of steering control.
How Beginners Should Brake an Electric Scooter
Look Ahead
Good braking begins before touching the lever. Watch traffic, pedestrians, driveways, parked cars, debris, potholes, and changes in the road surface.
The more time you have to respond, the less aggressively you need to brake.
Release the Throttle
Stop accelerating before applying the brakes. Some scooters automatically cut motor power when the brake lever is activated, but releasing the throttle first creates a smoother transition.
Bend Your Knees
Keep your knees slightly bent rather than locking your legs. This helps your body absorb changes in speed and road surface.
Shift Your Weight Slightly Back
As the scooter slows, move your hips slightly rearward and lower your center of gravity. Keep both hands firmly on the handlebars.
Do not lean so far back that the front tire becomes unloaded. The goal is to resist forward momentum while maintaining control.
Apply the Brakes Progressively
Begin with light pressure and increase it smoothly. Abruptly grabbing a powerful front brake can destabilize the scooter, especially on loose, wet, or uneven pavement.
Progressive braking also helps you feel how much traction is available.
Keep the Scooter Straight
Whenever possible, complete most of your braking before entering a turn. Tires have limited available grip. Asking them to brake hard and turn sharply at the same time increases the risk of sliding.
Practice Emergency Stops
Practice in an empty, dry, level area away from traffic. Begin at a low speed and mark a stopping point. Gradually increase speed as your technique becomes consistent.
The goal is not merely to stop quickly. It is to stop quickly without locking a wheel, losing balance, or swerving.
What Determines Electric Scooter Stopping Distance?
Stopping distance is not a fixed number. It changes with several factors.
Speed
Higher speed increases stopping distance significantly. A small increase in speed can require substantially more distance because the scooter carries more kinetic energy.
Rider and Cargo Weight
A heavier total load may require more braking force and can generate more heat. Never exceed the manufacturer’s stated weight capacity.
Tire Grip
Brakes cannot stop a scooter effectively unless the tires can grip the road. Low pressure, worn tread, tire damage, sand, gravel, water, leaves, painted road markings, and metal utility covers can reduce traction.
Road Gradient
Stopping downhill requires more distance than stopping on level ground. Brakes can also heat up during a long descent.
Weather
Wet pavement reduces grip and can change the feel of some braking systems. Water or contamination on a rotor may temporarily affect disc-brake response.
Brake Temperature
Repeated hard stops create heat. Excessive heat can reduce braking performance, particularly during long descents or aggressive riding.
Brake Condition
Worn pads, loose cables, air in a hydraulic system, contaminated rotors, damaged levers, or poor adjustment can all increase stopping distance.
Rider Reaction Time
The scooter continues moving between noticing a danger and applying the brakes. Looking at a phone, wearing headphones that block surrounding sounds, or riding too closely behind another vehicle reduces the time available to react.
Common Signs of Brake Problems
The Lever Pulls Too Close to the Handlebar
This can indicate cable stretch, worn pads, incorrect adjustment, a hydraulic issue, or air in a hydraulic line.
Braking Feels Weak
Weak braking may be caused by worn pads, glazed pads, contamination, cable problems, heat, incorrect adjustment, or an electronic fault.
Squealing
Some brake noise can occur temporarily, particularly when the brakes are wet. Persistent squealing may indicate contamination, glazed pads, rotor alignment problems, or incompatible components.
Grinding or Scraping
A harsh grinding sound should not be ignored. It can mean the brake pad material is worn away or a component is contacting the rotor incorrectly.
Pulsing or Vibration
A pulsing brake lever or repeated vibration may indicate a bent rotor, uneven rotor surface, loose fastener, damaged tire, or wheel problem.
The Scooter Pulls to One Side
This can result from uneven braking, tire-pressure differences, alignment problems, damaged components, or inconsistent traction.
The Brake Does Not Release
A sticking cable, damaged lever, misaligned caliper, seized component, or electronic problem may prevent the brake from releasing fully.
Do not continue riding normally when the scooter has a serious braking problem. Switch it off, inspect it, and arrange qualified service when necessary.
Beginner Brake Inspection Checklist
Perform this check before riding:
- Switch the scooter off.
- Inspect the brake levers for looseness or damage.
- Check visible cables and hoses for fraying, kinks, cracks, or leaks.
- Examine visible rotors for obvious bending, contamination, or looseness.
- Check that pads are not worn beyond the manufacturer’s limit.
- Confirm that wheels rotate normally without severe brake drag.
- Squeeze each brake control and confirm that it feels consistent.
- Check tire condition and pressure.
- Turn the scooter on and test electronic braking at walking speed.
- Perform a controlled low-speed stop before entering traffic.
Consumer Product Safety Commission (CPSC) guidance specifically advises riders to inspect brakes, cables, tires, handlebars, lights, and other components before riding.
Basic Electric Scooter Brake Maintenance
Keep Rotors and Pads Free of Oil
Never spray chain lubricant, penetrating oil, tire dressing, silicone spray, or general-purpose polish near a disc rotor or brake pad.
Even a small amount of oil can reduce friction and cause noise or weak braking.
Clean Carefully
Use a product specifically identified as safe for disc brakes and follow its instructions. Apply it in a ventilated area and prevent overspray from reaching electrical components, painted surfaces, tires, or other materials unless the manufacturer confirms compatibility.
Check Mechanical Cables
Look for fraying, corrosion, crushed housing, sharp bends, and excessive slack. A damaged brake cable should be replaced rather than temporarily repaired.
Monitor Pad Wear
Disc-brake pads become thinner with use. Some pads have wear lines, while others require measurement or comparison with the service manual.
Do not wait for metal backing plates to grind against the rotor.
Inspect Fasteners
Brake calipers, levers, rotors, cable anchors, and mounting brackets depend on properly tightened fasteners.
Use the torque values in the scooter’s service documentation. Overtightening can strip threads or damage components, while undertightening can allow movement.
Avoid Random Replacement Parts
Brake pads that look similar may have different shapes, compounds, backing plates, or dimensions. Rotors also vary in diameter, thickness, bolt pattern, and mounting style.
Confirm the exact scooter model and brake-caliper model before ordering parts.
Know When to Use a Professional
Professional service is recommended when:
- Hydraulic fluid is leaking
- A hydraulic brake requires bleeding
- The rotor or wheel is damaged
- Mounting threads are stripped
- The brake repeatedly loses adjustment
- The electronic brake produces an error
- You cannot identify the correct replacement part
- The scooter still brakes poorly after basic inspection
Mistakes Beginners Should Avoid
Riding Without Testing the Brakes
A brake that worked yesterday may have developed a loose cable, damaged lever, electronic fault, or contamination problem.
Using Only One Brake Without Understanding the System
Some scooters distribute braking automatically, while others have separate controls. Learn what each lever or control activates.
Grabbing the Front Brake Suddenly
Sudden front braking can shift weight forward rapidly and destabilize the rider.
Braking Hard While Turning
Reduce speed before the turn, then steer smoothly.
Ignoring Tire Pressure
The brake may function perfectly while the tire lacks enough traction to stop safely.
Lubricating a Noisy Brake
Never apply lubricant to a brake rotor, pad, drum, or braking surface. Lubricant reduces the friction the brake needs.
Copying Generic Adjustment Videos
Electric scooter designs vary considerably. A procedure for one model may be incorrect for another.
Continuing to Ride After Braking Changes
A sudden change in braking feel, sound, lever travel, or stopping distance deserves immediate inspection.
Final Thoughts
Electric scooter braking is a combination of equipment condition, rider technique, tire grip, road conditions, and awareness.
Beginners should first identify which brakes their scooter uses. Next, they should learn how the controls activate those brakes and practice progressive stopping in a controlled area. A brief inspection before every ride can reveal loose controls, damaged cables, worn pads, tire problems, and other issues before they become emergencies.
Most importantly, never assume that powerful brakes can compensate for excessive speed or poor following distance. The safest stop is often the one you anticipate early enough to perform smoothly.
Frequently Asked Questions
1. What is the best type of electric scooter brake for a beginner?
There is no single best brake for every beginner. A well-designed dual system combining a dependable mechanical brake with electronic braking can provide controlled stopping and useful redundancy. Drum brakes are attractive for low-maintenance commuting, while disc brakes offer strong performance and easier visual inspection. Overall design and maintenance matter more than the brake label alone.
2. How often should electric scooter brakes be checked?
Perform a basic visual and functional check before every ride. More detailed inspections should follow the scooter manufacturer’s maintenance schedule. Riders who travel frequently, descend steep hills, ride in rain, or carry heavier loads may need more frequent service.
3. Why are my electric scooter brakes squeaking?
Squeaking can result from water, dust, contamination, glazed pads, rotor misalignment, vibration, or worn components. Temporary noise after riding through water may disappear when the brake dries. Persistent noise, weak braking, grinding, or vibration should be inspected before continued riding.
4. Can I use bicycle brake pads on an electric scooter?
Only when the pad is confirmed to match the exact brake caliper and scooter specifications. Many scooters use bicycle-style components, but visual similarity does not guarantee compatibility. Compare the manufacturer’s part number, dimensions, shape, compound, retention method, and minimum-thickness requirements.
5. Should I use the front brake or rear brake first?
Follow the scooter manufacturer’s instructions because braking controls differ. In general, brakes should be applied progressively while the scooter remains upright and the rider shifts slightly rearward. Avoid suddenly locking either wheel. Practice at low speed until you understand how the scooter distributes braking force.