How to Fix an Electric Scooter That Won’t Turn On
*We may earn a commission for purchases made using our links. Please see our disclosure to learn more.
Nothing is more frustrating than stepping onto your electric scooter, pressing the power button, and being met with complete silence. Whether you’re rushing to work, heading out for a weekend adventure, or simply trying to enjoy your daily commute, a scooter that won’t turn on can derail your entire day. The good news? Most electric scooter power issues stem from common, fixable problems that don’t require expensive repairs or professional intervention.
This comprehensive guide walks through the systematic approach to diagnosing and fixing an electric scooter that won’t turn on. From simple battery checks to more complex electrical troubleshooting, you’ll discover the step-by-step process that can get your scooter back on the road. Understanding these repair techniques not only saves money on service calls but also empowers riders to maintain their scooters proactively, preventing future breakdowns.
“The key to fixing any electric scooter issue is following a logical troubleshooting sequence, starting with the most common causes before moving to complex electrical problems.”
– Electric Vehicle Repair Association
Key Takeaways
- Battery issues cause 70% of electric scooter power problems – Check battery charge level, connections, and voltage first
- Simple connection problems often masquerade as major electrical failures – Inspect all wire connections and fuses
- Environmental factors like moisture and temperature extremes can temporarily disable scooter electronics
- Systematic troubleshooting prevents unnecessary part replacements and saves both time and money
- Preventive maintenance including regular charging and storage practices can eliminate most power-related issues
Recommended Amazon Products for Electric Scooter Repairs
1. Digital Multimeter for Voltage Testing
TESMEN TM-510 Digital Multimeter
The TESMEN TM-510 Digital Multimeter is an essential tool when you need to fix an electric scooter that won’t turn on. With smart auto-ranging, 4000 counts accuracy, and a non-contact voltage tester, this device makes troubleshooting quick, safe, and reliable. Whether it’s a dead battery, wiring issue, or faulty connection, the TM-510 helps identify problems so you can get your scooter running again. Lightweight, user-friendly, and packed with safety features, it’s perfect for both beginners and pros.
When your electric scooter won’t turn on, one of the first tools you’ll need is a reliable multimeter to diagnose the issue. The TESMEN TM-510 Digital Multimeter is designed for exactly that. Its smart auto mode allows you to measure AC/DC voltage, resistance, and continuity without constantly switching settings. This makes it an excellent choice for scooter owners who need quick answers.
- Smart Auto Mode: Automatically detects voltage, resistance, and continuity for easy troubleshooting.
- Non-Contact Voltage Test: Safer way to check wires without direct contact.
- User-Friendly Design: Backlight, flashlight, and auto-shutdown make it ideal for home and scooter repairs.
- Limited Range: Not suitable for very high-voltage industrial use.
- Small Screen Size: May be harder to read for some users.
- Basic Functions Only: Doesn’t include advanced measurements like capacitance or frequency.
2. Electric Scooter Battery Charger (Universal)
NOCO GENIUS1 Smart Battery Charger
The NOCO GENIUS1 Smart Battery Charger is the ultimate solution when you need to fix an electric scooter that won’t turn on due to a drained or damaged battery. Compact yet powerful, this 1A charger works with 6V and 12V lead-acid and lithium-ion batteries, restoring power safely with temperature compensation and overcharge protection. It can even revive batteries as low as 1 volt, making it ideal for scooters, motorcycles, and other small vehicles.
If your electric scooter won’t turn on, there’s a good chance the battery is the culprit. That’s where the NOCO GENIUS1 Smart Battery Charger comes in. This compact, all-in-one device acts as a charger, maintainer, trickle charger, and desulfator, giving you everything you need to keep your scooter battery in top condition.
- Versatile Charging: Works with 6V & 12V lead-acid and lithium-ion batteries.
- Battery Recovery: Can revive dead or deeply discharged batteries from 0–1V.
- Safe Charging: Features overcharge protection and temperature compensation.
- Slower Output: At 1A, charging larger batteries may take longer.
- Requires Power Outlet: Not a portable, on-the-go solution.
- Basic Display: Lacks advanced screen features found in premium chargers.
3. Electrical Contact Cleaner Spray
WD-40 Specialist Contact Cleaner Spray
The WD-40 Specialist Contact Cleaner Spray is a must-have when troubleshooting electrical problems to fix an electric scooter that won’t turn on. Its quick-drying, residue-free formula removes dirt, oil, condensation, and flux from sensitive components like switches, connectors, and circuit boards—restoring clean electrical contact for reliable scooter performance. Safe on most plastics and metals, this precision spray helps prevent shorts and improves conductivity.
If your electric scooter won’t turn on, dirt, moisture, or oxidation inside the switches and connectors might be the cause. The WD-40 Specialist Contact Cleaner Spray is designed to quickly clear away oil, grime, and condensation from delicate electrical components without leaving any residue behind.
- Residue-Free Formula: Cleans sensitive electrical parts without leaving buildup.
- Fast Drying: Ideal for quick troubleshooting and scooter repairs.
- Safe on Most Materials: Works on metals, plastics, and rubbers.
- Not for Screens: Avoid using on scooter displays or adhesive parts.
- Strong Odor: Requires ventilation during use.
- Needs Careful Application: Always test on plastics before spraying.
4. Electric Scooter Fuse Kit
BBjinronjy 306pcs Fuse Assortment Kit
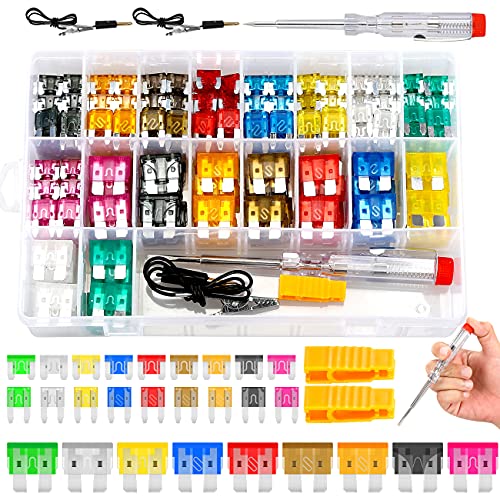
The BBjinronjy 306pcs Fuse Assortment Kit is the perfect solution when a blown fuse is the reason your electric scooter won’t turn on. With standard, mini, and low-profile mini blade fuses ranging from 2A to 35A, this kit ensures you’ll always have the right replacement on hand. Made from durable zinc alloy with color-coded housings for easy identification, it also includes fuse pullers and circuit testers—making troubleshooting and fixing scooters, cars, boats, and motorcycles simple and efficient.
If your electric scooter won’t turn on, one of the most common culprits is a blown fuse. The BBjinronjy 306pcs Fuse Assortment Kit provides everything you need to quickly diagnose and replace faulty fuses. With a wide range of amperages (2A–35A) and three different sizes (standard, mini, and low-profile mini), this kit ensures compatibility with scooters, cars, trucks, motorcycles, RVs, and even boats.
- Complete Set: Covers 27 commonly used blade fuses in multiple sizes and amperages.
- Easy Identification: Color-coded and labeled for quick fuse replacement.
- Extra Tools Included: Comes with fuse pullers and circuit testers for fast troubleshooting.
- Bulk Packaging: May include more fuses than most users need for scooters.
- No Storage Labels Inside Box: Requires organizing for faster selection.
- Plastic Case Quality: Could be sturdier for heavy-duty use.
Understanding Electric Scooter Power Systems
Electric scooters operate on relatively simple electrical systems, but understanding the basic components helps tremendously when troubleshooting power issues. The power system consists of the battery pack, charging port, power button, display panel, motor controller, and various safety fuses. When any of these components fails or loses connection, the entire system can shut down as a protective measure.
Most modern electric scooters include multiple safety systems designed to prevent damage from electrical faults. These systems can sometimes trigger false shutdowns, making a perfectly functional scooter appear broken. Understanding how these safety mechanisms work is crucial for effective troubleshooting.
The battery management system (BMS) monitors cell voltage, temperature, and current flow. If any parameter falls outside safe operating ranges, the BMS disconnects power entirely. This protection feature, while essential for safety, often confuses riders who assume their scooter has suffered a major failure when it’s actually protecting itself from potential damage.
Step-by-Step Troubleshooting Process
Initial Assessment and Safety Checks
Before diving into complex diagnostics, start with basic visual inspection and safety verification. Ensure the scooter is on a stable, flat surface away from traffic or obstacles. Check for obvious physical damage, loose components, or signs of water intrusion that might affect electrical systems.
Remove the scooter from any charging connection and allow it to sit unpowered for several minutes. This reset period allows internal electronics to discharge completely, often resolving temporary glitches that prevent normal startup. Many seemingly dead scooters simply need this electronic reset to function properly again.
Examine the power button itself for damage, debris, or sticking. Sometimes the button mechanism becomes jammed or filled with dirt, preventing proper electrical contact. Clean around the button area with compressed air or a soft brush, ensuring nothing physically blocks the button’s movement.
Battery Diagnosis and Testing
Battery-related issues account for the majority of electric scooter power problems. Begin by checking the obvious: is the battery charged? Even if you remember charging recently, batteries can discharge unexpectedly due to parasitic drain or cell degradation. Connect the charger and observe whether charging indicators activate normally.
If the charger shows no activity, test the charging port for loose connections or debris. Corrosion in the charging port prevents proper electrical contact, making charging impossible. Clean the charging port with electrical contact cleaner and ensure the charger cable fits snugly without excessive play.
Use a multimeter to test battery voltage directly at the battery terminals. A fully charged electric scooter battery should read close to its rated voltage – typically 36V, 48V, or 60V depending on your scooter model. Voltage significantly below the rated level indicates either a discharged battery or individual cell failure within the battery pack.
Temperature affects battery performance dramatically. Extremely cold batteries may not provide sufficient power for startup, while overheated batteries trigger safety shutdowns. Allow batteries to reach moderate temperatures before testing, and consider environmental conditions when diagnosing power issues.
Electrical Connection Inspection
Loose or corroded electrical connections cause many mysterious power failures in electric scooters. Start by examining all visible wire connections, paying special attention to areas where wires connect to the battery, motor controller, and display panel. Look for signs of corrosion, loose terminals, or damaged wire insulation.
Vibration from normal riding gradually loosens electrical connections over time. Gently wiggle each connection while attempting to power on the scooter. If the scooter intermittently responds to power button presses during this test, you’ve likely identified a loose connection that needs tightening or replacement.
Water damage creates particularly challenging electrical problems. Even scooters rated as water-resistant can suffer connection problems if exposed to heavy rain or puddle splashing. Look for signs of moisture intrusion, white powdery corrosion, or green oxidation around electrical connections. These symptoms indicate water damage that requires thorough cleaning and drying.
Pay attention to the main power connections between the battery and motor controller. These high-current connections are particularly prone to loosening and corrosion. Ensure these connections are tight, clean, and properly insulated to prevent power loss and potential safety hazards.
Common Causes and Solutions
Blown Fuses and Circuit Protection
Electric scooters incorporate various fuses and circuit breakers to protect electrical components from damage. When these safety devices activate, they completely cut power to prevent equipment damage. Locate your scooter’s fuse box – typically near the battery or motor controller – and inspect each fuse visually.
Blown fuses often show obvious signs of failure: darkened glass, broken internal filaments, or burnt appearance. However, some fuse failures are subtle and require multimeter testing to confirm. Test each fuse for continuity, replacing any that don’t show proper electrical connection.
Understanding why fuses blow prevents recurring problems. Overloading the scooter beyond its weight capacity, riding through deep water, or electrical short circuits can cause fuse failure. Address the underlying cause along with replacing the blown fuse to prevent immediate re-failure.
Some scooters use resettable circuit breakers instead of traditional fuses. These devices can be reset by pressing a small button or allowing them to cool down after activation. Locate any circuit breakers in your scooter’s electrical system and attempt to reset them before assuming component failure.
Motor Controller Malfunctions
The motor controller acts as the brain of your electric scooter’s power system, managing power delivery from the battery to the motor based on throttle input and system feedback. Controller failures can completely prevent scooter startup, even when all other components function perfectly.
Controller problems often manifest as complete power loss, erratic power delivery, or unusual sounds during operation attempts. These sophisticated electronic components are sensitive to voltage fluctuations, heat buildup, and moisture intrusion. Inspect the controller housing for signs of overheating, water damage, or physical impact damage.
Many controller issues stem from loose or corroded connections rather than internal component failure. Carefully inspect all wires entering and exiting the controller box, ensuring connections are tight and free from corrosion. Clean any corroded connections with electrical contact cleaner and apply dielectric grease to prevent future corrosion.
Heat management plays a crucial role in controller longevity. Controllers mounted in poorly ventilated locations or covered with debris can overheat during operation, triggering protective shutdowns. Ensure adequate airflow around the controller and remove any obstructions that might impede cooling.
Display and User Interface Problems
Modern electric scooters rely on digital displays and user interfaces that can fail independently from the main power system. A malfunctioning display might prevent the scooter from recognizing power button presses or throttle input, effectively disabling the entire system despite having adequate battery power.
Display problems range from completely blank screens to partially functional interfaces showing error codes or incorrect information. Water intrusion frequently causes display failures, as these components often lack the robust sealing found in other electrical components. Inspect the display area for signs of moisture, condensation, or physical damage.
Some scooters allow display bypass for emergency operation. Consult your owner’s manual for emergency startup procedures that might allow scooter operation even with a failed display. These procedures typically involve specific button combinations or connection jumpers that bypass the normal user interface.
Connection problems between the display and main electrical system can simulate display failures. Inspect the cable connecting the display to the main wiring harness, ensuring it’s properly seated and free from damage. These cables experience significant flexing during normal operation and may develop intermittent connection problems over time.
Advanced Troubleshooting Techniques
Voltage Drop Testing
Voltage drop testing identifies hidden electrical problems that prevent proper power delivery even when battery voltage appears normal. This testing requires a digital multimeter and systematic measurement of voltage at various points in the electrical system while attempting to start the scooter.
Begin by measuring battery voltage at the battery terminals, then measure voltage at the motor controller input while pressing the power button. Significant voltage drop between these points indicates resistance in the power cables, connections, or protective devices. This resistance prevents adequate power from reaching critical components.
Extend this testing throughout the electrical system, measuring voltage at the display panel, throttle assembly, and other key components. Voltage should remain relatively consistent throughout the system when the scooter is attempting to start. Large voltage drops pinpoint problem areas requiring attention.
Temperature affects electrical resistance, so voltage drop problems may be intermittent based on environmental conditions. Cold weather increases resistance in all electrical connections, potentially causing startup problems that disappear as temperatures rise. Consider temperature effects when diagnosing intermittent electrical issues.
Signal Tracing and Communication Issues
Modern electric scooters use sophisticated communication between components, with the display, controller, and battery management system constantly exchanging information. Communication failures can prevent startup even when all individual components function properly.
These communication systems typically use specific voltage signals or digital protocols to coordinate operation. A multimeter can help trace these signals, but this testing requires understanding of your specific scooter’s electrical architecture. Consult technical documentation or online forums for signal specifications relevant to your scooter model.
Interference from external sources can disrupt communication signals in sensitive electronic systems. LED lights, cell phone chargers, or other electronic devices operating nearby might interfere with proper scooter operation. Test your scooter in different locations to rule out environmental interference.
Grounding problems frequently cause communication issues in electric vehicles. Ensure all ground connections are tight and free from corrosion. Poor grounding creates electrical noise that can disrupt sensitive communication signals, leading to erratic operation or complete system shutdown.
Preventive Maintenance Strategies
Regular Battery Care
Proper battery maintenance prevents most electric scooter power problems before they occur. Establish a regular charging routine that keeps batteries at optimal charge levels without overcharging. Lithium batteries perform best when maintained between 20% and 80% charge levels for daily use.
Temperature management extends battery life significantly. Store scooters in climate-controlled environments when possible, avoiding extreme heat or cold that degrades battery chemistry. If cold-weather storage is unavoidable, bring batteries to room temperature before charging or use.
Monthly deep-cycle charging helps maintain battery balance and capacity. Allow the battery to discharge to approximately 20% capacity, then charge completely to 100% without interruption. This process helps the battery management system recalibrate and can resolve minor cell imbalance issues.
Monitor battery performance over time, noting changes in range, charging time, or power delivery. Gradual degradation is normal, but sudden changes often indicate developing problems that can be addressed before complete failure occurs.
Electrical System Maintenance
Regular inspection and cleaning of electrical connections prevents many power-related failures. Develop a monthly routine of visually inspecting all accessible electrical connections, looking for signs of corrosion, loosening, or damage. Address minor issues before they develop into major problems.
Apply dielectric grease to electrical connections periodically to prevent corrosion and ensure reliable contact. This maintenance is particularly important for scooters operated in harsh environments or areas with high humidity, salt air, or industrial pollution.
Keep electrical components clean and dry whenever possible. Use compressed air to remove debris from controller housings, display assemblies, and charging ports. Avoid using water or chemical cleaners on electrical components unless specifically designed for that purpose.
Document your maintenance activities and any issues discovered during inspection. This record helps identify recurring problems and provides valuable information for troubleshooting future issues. Note environmental conditions, usage patterns, and component performance trends.
Environmental Factors and Seasonal Considerations
Weather conditions significantly impact electric scooter reliability and performance. Cold temperatures reduce battery capacity and can cause temporary power system shutdowns, while excessive heat triggers protective systems designed to prevent component damage. Understanding these environmental effects helps distinguish between actual failures and temporary operational limitations.
Moisture presents ongoing challenges for electric scooter operation. Even water-resistant models can experience problems when exposed to heavy rain, puddles, or high humidity over extended periods. Develop strategies for protecting your scooter from moisture while maintaining normal operation in varied weather conditions.
Seasonal storage requires special consideration for electric scooter maintenance. Long-term storage without proper preparation can lead to battery degradation, corrosion, and system failures when attempting to return the scooter to service. Follow manufacturer guidelines for seasonal storage, including battery maintenance and system preservation.
Salt exposure from winter road treatments or coastal environments accelerates corrosion in electrical systems. Rinse scooters with fresh water after exposure to salt, and increase the frequency of electrical connection inspection and maintenance in these environments.
Professional Repair vs. DIY Solutions
Understanding the limits of do-it-yourself repair helps avoid dangerous situations and prevents damage to expensive components. While many electric scooter power issues can be resolved with basic tools and knowledge, some problems require specialized equipment or expertise that’s best handled by qualified technicians.
Battery pack issues often fall into the professional repair category. Lithium battery packs contain sophisticated management systems and potentially dangerous chemistry that requires specialized knowledge and safety equipment. Attempting battery pack repair without proper training can result in fire, explosion, or toxic exposure hazards.
Motor controller replacement typically requires programming or configuration that’s beyond typical consumer capabilities. While diagnosing controller problems can be done with basic electrical knowledge, replacement often involves software configuration that requires dealer or professional intervention.
Warranty considerations also influence the decision between DIY and professional repair. Many electric scooter warranties become void if unauthorized repairs are attempted, making professional service worthwhile even for relatively simple problems. Review warranty terms before attempting any repairs that might affect coverage.
Conclusion
Fixing an electric scooter that won’t turn on doesn’t have to be an overwhelming challenge. By following a systematic troubleshooting approach and understanding the common causes of power failures, most issues can be resolved without expensive professional intervention. The key lies in methodical diagnosis, starting with the most likely causes and working through increasingly complex possibilities.
Remember that patience and safety should guide every repair attempt. Rushing through diagnostics or ignoring safety precautions can turn minor problems into major failures or create dangerous situations. Take time to understand your scooter’s electrical system, document your findings, and don’t hesitate to seek professional help when repairs exceed your comfort level or expertise.
Regular maintenance and preventive care eliminate most power-related problems before they occur. Establishing good charging habits, protecting electrical connections from environmental damage, and conducting periodic inspections create a foundation for reliable scooter operation. These simple practices save time, money, and frustration while extending the life of your electric scooter investment.
The techniques covered in this guide apply to most electric scooter models and power system configurations. While specific details may vary between manufacturers, the fundamental troubleshooting principles remain consistent. Use this knowledge as a starting point for understanding your specific scooter’s needs, and adapt the procedures to match your model’s particular requirements.
Frequently Asked Questions
Q: How long should I charge my electric scooter battery before testing if it will turn on?
A: Charge the battery for at least 2-4 hours before testing, even if you think it was recently charged. A completely dead battery may require several hours of charging before it has enough power to activate the scooter’s electrical systems. If the scooter still won’t turn on after 4 hours of charging, the problem likely lies elsewhere in the electrical system.
Q: Can cold weather permanently damage my electric scooter’s ability to start?
A: Cold weather typically causes temporary startup issues rather than permanent damage. Lithium batteries lose capacity in cold conditions and may not provide enough power for startup until they warm up. However, repeated exposure to freezing temperatures without proper storage can cause permanent battery damage. Store your scooter in temperature-controlled environments when possible.
Q: What should I do if my scooter turns on but immediately shuts off?
A: This symptom usually indicates a safety system activation, such as low battery protection, overheating, or an electrical fault. Check the battery charge level first, then inspect for loose connections or damaged components. Allow the scooter to cool down if it was recently used heavily, as thermal protection may be preventing normal operation.
Q: How can I tell if my electric scooter’s fuse is blown without special tools?
A: Visually inspect the fuse through its clear housing, looking for a broken filament, darkened glass, or burnt appearance. Many blown fuses show obvious signs of failure. However, some fuse failures are subtle and require a multimeter for definitive testing. When in doubt, try replacing the suspected fuse with a new one of the same amperage rating.
Q: Is it safe to use my electric scooter after it has been exposed to rain?
A: Allow the scooter to dry completely before attempting to use it after rain exposure. Water in electrical connections can cause shorts, corrosion, or component damage. Inspect charging ports, display areas, and other electrical components for signs of moisture intrusion. If water has entered electrical components, professional cleaning and inspection may be necessary before safe operation can resume.

